Hannah Neurotica is a talent to be reckoned with, and for good reason. She's the brains and beauty behind Ax Wound Zine - a self-published zine that showcases and investigates the issues of gender, sex, and horror, as well as taking to the air waves with Zine Core Radio and Ax Wound Radio. She's also one of the strongest voices for feminism in the horror genre, establishing February as Women in Horror Recognition Month. I even made her a bit of "fan art" a while back which you can check out by clicking here. She's an extraordinary women and one I consider a friend.
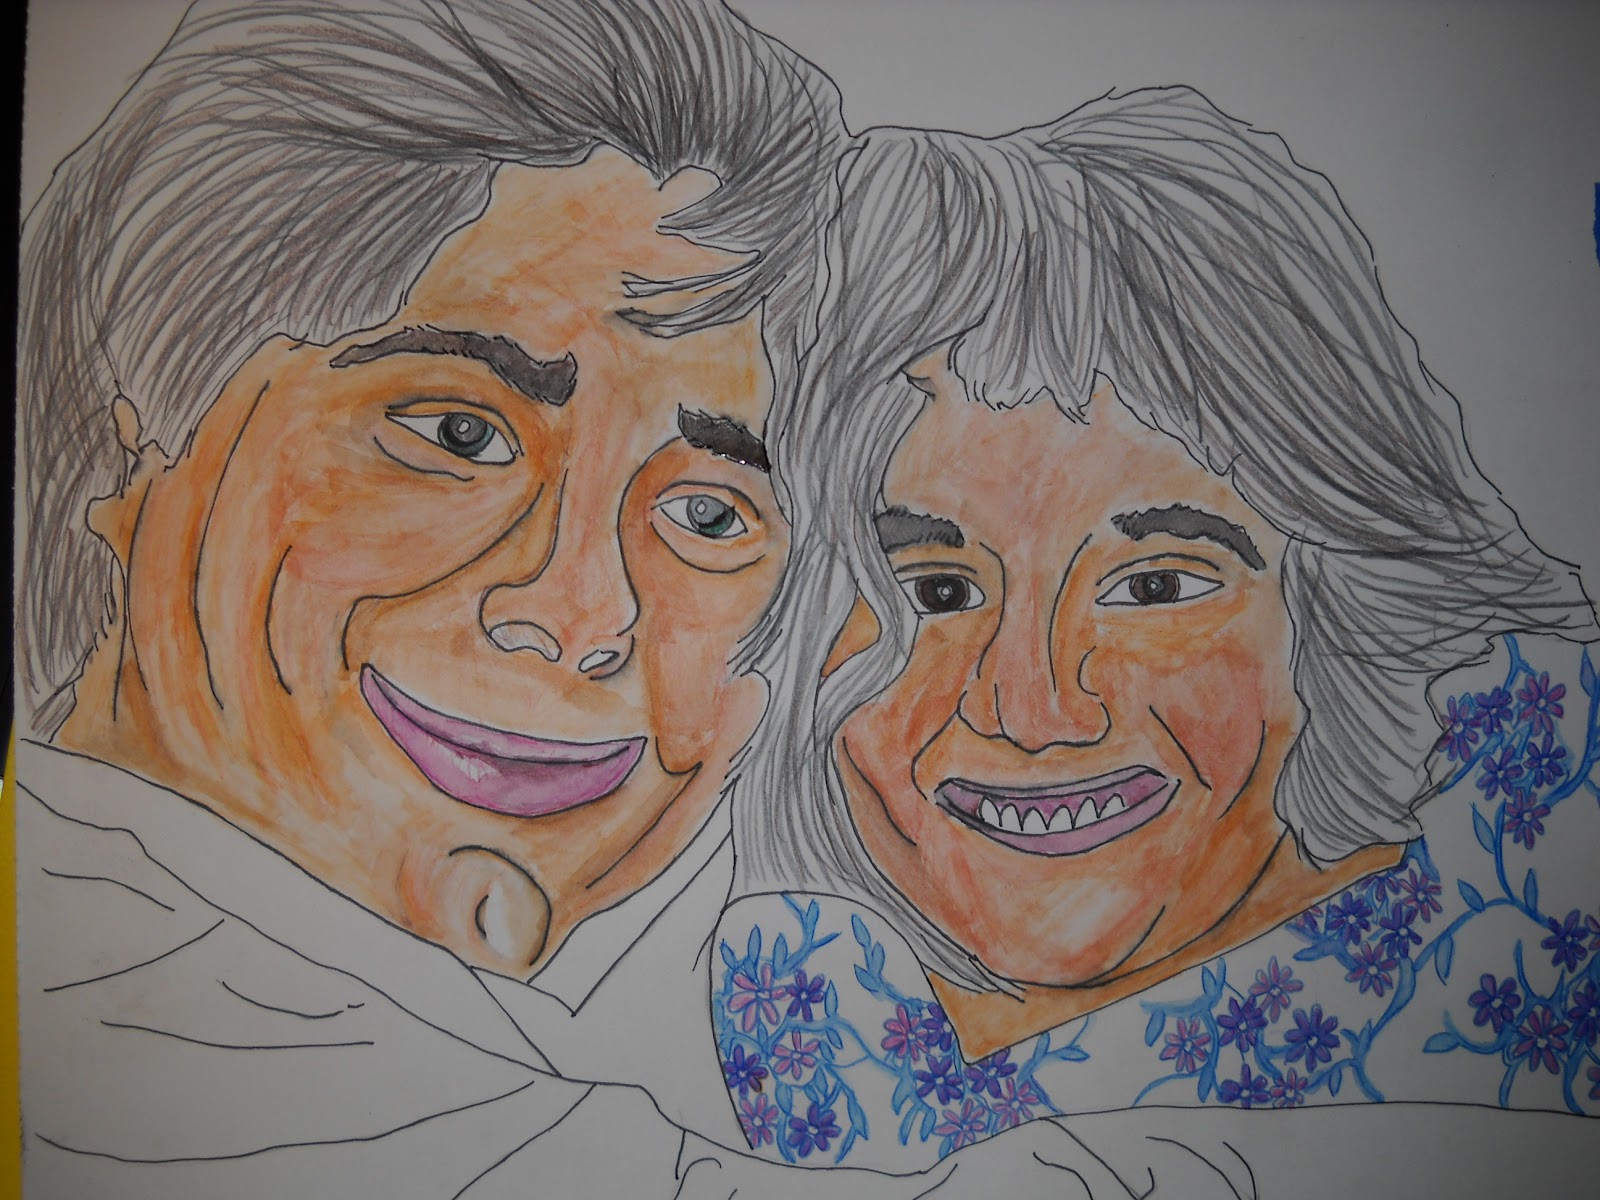
A cultured writer and social philanthropist Hannah is always eager to lend a helping hand to a worthwhile cause, using her voice to champion the efforts of those most often overlooked. I wanted to show my appreciation to Hannah with a piece of artwork, one with a personal touch. Her father passed away not long ago and their relationship was quite strong as you can imagine. I wanted to pass along my interpretation of a fond memory, and I started with this old photograph from her childhood.
As you can tell it's an older photograph, and I'm sure a bit blurry from scanning it, but this is the happy moment I hoped to capture. The first thing I would have to do is go in and divide the piece into sharp lines for reconstruction. I started out on Bristol board with pencil.
Sketched out like this, you can tell I need a bit more practice with my figure drawing, but it's hard to find fault in a labor of love. Here I roughed out a bit more of a close-up to factor out the background that I couldn't discern, plus this puts more focus on the individuals. Once I was happy with my pencil marks I went in and outlined it all in black pen and erased my lines.
I decided to try something new with this piece - water color pencils. I recently received a set for Christmas and put them to use. They color just like a normal pencil, but you have the ability to add water and blend to an enhanced quality not entirely offered by regular watercolors. The difficulty here was creating a realistic skin tone. I had to build this layer by layer and factor in how it would all blend.
I used a combination of black and brown for the hair, curious how it would blend and hopeful that some of the line work would stay after adding water. I added a bit more red to perk up the color in the face and lips and filled in the eyes.
I free-handed the pattern on Hannah's dress, hoping to mirror what I could make out from the photo. It's probably not the best representation but it helps fill in the void of white from before.
Next was just adding more color, but I started to fear that it wouldn't quite look right when I began to blend.
At a happy stopping point, I began to blend with just a brush and water. The hues I had shaped before blended nicely in the face. Not too bad for only having red, orange, and yellow to work with for a flesh tone.
I had to be careful to follow within the lines and to not go over the designated areas that were to be lighter than others. I still wanted to factor in light and shadows in with the blending. In retrospect I would also use a pen that wasn't water soluble. There were a few instances were the ink would run, but I was pretty careful throughout.
I also blended some of the flowers on Hannah's shirt which dulled down the sharpness and faded out how terrible I am at drawing flowers. I was quite pleased with the hair, as I blended it did keep the harsh lines I drew in before.
Here I began to retouch some of the ink and blend in some other areas, particularly along the hairlines, eyes, and lips.
To make the piece "pop" a bit more I decided to use a touch of black Sharpie to outline the figures. This couple with the pen lines offers a nice duality and small touches like eye lashes. To pop it even further I decided to add a blue, halo like background to draw in the eye and match Hannah's dress. This was done by simply taking a blue water color pencil and drawing along the edge of the hair and blending outward with water.
All in all I'm happy with this piece, especially for working with a new medium. I definitely need to work on figure drawing, but it's not bad from a 20+ year old photograph. I wanted this piece to look like a caricticure you'd buy off a sidewalk artist filled with hand drawn whimsy after a day out on adventure. It's not a world class portrait, nor was that what I was aiming for, but instead I found a happy middle ground of almost cartoony yet still purely recognizable. I wanted to capture a moment of glee and wonder when all was right with the world. I hope it will serve as a remembrance of good times had, not to be forgotten. I like to think that Hannah's father instilled in her the wonderful spirit that exudes from her to this day. I hope that this token of friendship serves that spirit well.
Over the Christmas holidays, I had a chance to go rummaging with my father. I'm convinced he's part Gypsy as he can sniff out a bargain like a bloodhound. We went to visit a good buddy of his named Mokie, who is in the business of true wheeling & dealing. Mokie largely purchases lots from estate sales and storage units that have expired contracts and then auctions off the contents, sometimes for pennies on the dollar. The trick is you always have to check in and stop by. Half the fun is digging around for the diamond in the rough. I'm always a sucker for anything movie related, especially horror movies. One such visit I was able to snag this little gem of an art project.
The Creature from the Black Lagoon
Researching this online I found out that it's a re-release from March 1999 by Polar Lights of the original Revel model kit. This all plastic assembly kit is a replica of the originals sold long ago. It features all the same advertising as previously issued.
This was the same classic set-up as years past. I had to twist the pieces apart and begin assembly with some epoxy I had left over. Here is the start of some of the pieces already assembled.
Working with the epoxy meant having to glue and hold the limbs of the Gill Man just right while it dried. In the future I will definitely use a tube based glue instead of something you have to mix in equal parts.
The only snag for the project was it didn't include a small snake that is supposed to wrap around the tree branch on the base. The whole thing is a forest green, which is meant to serve as a base for painting it in color, but I had a different idea in mind.
I spray painted the entire thing in black. I then over-shot it (spraying from the top) with a dark gray spray paint. I then over-shot it with just a touch of white spray paint. Some of this white came out as spittle, dotting the piece like an old 35mm print.
Over-shot painting from the top allowed for the base coat of black to shine through like true shadows. I then took a black Sharpie marker and began to outline the ridges and raised edges of the Gill Man.
I dotted some of the scales as well and outlined the face with Sharpie. This seems too harsh with all the black lines, but I wasn't quite done.
I went back over the piece in a thin coat of acrylic white wash (white paint & water) about 2-3 times to blend down the tonality of the black Sharpie.
These black lines help blend the seam lines left from the glue and such from the naked eye.
I wanted the Creature to stand alone like the black & white classic film that I remember.
I wanted the piece to look grainy, almost dirty - like a found print of the film itself.
The whole kit almost weighs nothing at all, a few ounces at most, yet very durable. The epoxy I used is a great adhesive, my only issues were in applying it. I wouldn't recommend anything else with less strength.
Here's a closer pic. The white, grey and black almost give it a slight bluish hue when photographed, but in person its just like out of the film.
The base is supposed to be some sort of a lagoon cavern with a large iguana and a skeleton hand sticking out of the crevice. I went back with black Sharpie and outlined the title that was sculpted into this piece.
All in all, it's been far too long since I've played with a model kit, they're quite a bit of fun. I'm eager to find a model shop soon and grab some more goodies. This would make for a great gift, pre-assembled or already put together. Click here to get your own. Click here for a whole gallery of Creature kits offered through time.
The illustrious Wes Allen, the bearded front man of The High Gears and the perverted mind behind The Blood Sprayer, commissioned me a while back about fabricating a sculpture for him of his Horror movie hero Leatherface. He left the specifics of the design to my discretion and I eagerly accepted the challenge. Honestly I love this entire film franchise, even the remakes. It's one of my all time favorite slasher films, and presents such an iconic depiction of American horror and the nuclear family. I wanted to include a bit of all of the films within this piece, which was quite the challenge. It was also a fabulous excuse to rewatch the entire series as research. Here's some of what came out of the project.
I started off with oven-bake modeling clay, which is easy to work with as long as you keep it moist. The clay bakes up in the oven and turns into a terra cotta solidity like a flower pot. I crafted a head shape from left over wire mesh and stuffed with paper towels.
Here's what I would build the head shape around. I didn't want the piece to be so heavy as a solid piece, but I needed to keep a solid form with its structure. Otherwise it would take far too long to bake and I would risk residual cracks if not careful.
I started with a basic shape to the head, sculpting the head, nose, eye sockets and the beginnings of the mouth.
I sculpted two sets of ears - one set for the head itself, and one for the design of the mask, which I'll discuss later.
I began working in the eyes and a bit more to the mouth, adding teeth and a gum line. It's important to have a bowl of water nearby for smoothing out creases and fingerprints as you go along.
As I became more comfortable with the shape of the head I decided to focus on the support structure for the piece.
I built up a neck and added a slight cock to the neck, which adds a bit of personality to the stillness of it all.
Angular and distorted, the piece was starting to come to life.
At different angles you can see the shape of the piece.
Here's everything just ready to bake!
Letting the piece dry for a couple days, I finally baked it. After pulling it, there were some residual cracks, but I knew that the wire mesh I had sculpted around would hold the piece intact. But I had a plan in place to fix this. I also pulled out the paper towels within from beforehand.
I went over the cracks with epoxy from Home Depot. It was a two part mix and stunk something fierce (probably because of how flammable it was), but that's half the fun of playing with art. Always work in well ventilated areas, kids.
I dusted the piece in baby powder because of the tackiness from the epoxy. This was an important precaution for the next step.
I began to coat the piece in 12-14 coats of liquid latex, dabbing each layer on, waiting to dry, and then applying again. It was a process, but well worth it.
I gently peeled the latex back, dusting with baby powder so as not to tear it. This is the pull of it, the underside.
Flipping it inside out, here's what I was chasing after.
I took a pair of cuticle scissors and snipped away the excess to create the representation I was looking for.
I only wanted one set of ears, the closest pair to the nose, so I trimmed those away and trimmed along the neck and chin line. I began painting this mask in a blend of acrylic paints. I was going for an aged leather look, just like dead skin left to dry.
It was tricky to blend the right degree of shadow and skin tone on something that was so curved. But I like where it was going.
Here's a front view.
I wanted to represent the side of Leatherface you don't often see, the cross-dressing aspect of the franchise that larger gets glazed over, but solely utilized for its creepiness. I added smeared blue paint for eye shadow, rosy pink paint for blush and a blood red jagged lining of paint for lipstick.
I went along the brow line with black thread and stitched into the mask. This was a bit of a challenge, especially with the rubber giving way and pulling. I didn't want to put too many holes in this or tear it. I had to do this after painting because there's no way I could paint around the thread. It was a challenge but it really adds to the look of the mask.
This stitching goes from the hairline down along the front side of the ears. I wanted a jagged, hand done touch to it all.
Now for the Pièce de résistance - I stole the hair from my girlfriend's brush. I picked it out over the course of a few weeks and amassed enough to cover the head. I adhered it to the mask using liquid latex.
Here's a side view where you can see more of the hair and the side stitching. The hair had to be layered and let me tell you what a pain in the ass it is to work with glue and hair. But I really think that it adds a super eerie factor to the piece and reflects the subject matter properly.
For the sculpt I chipped off the nose and the additional set of ears towards the back of the head. I then painted it up in a more rosy flesh like appearance with appropriate shading.
This look would be a base coat that I would then coat in Shellac.
With this coating of Shellac it gave the piece a urine hued coloring. The stink was another fun element to contend with, but this protective coating would ensure that the color wouldn't smudge with handling the piece. It gave it a bit of shine that I'm sure will dull with age while tuning down the painted flesh tones.
Here's the piece before the Shellac coating.
Here it is after.
The idea is that this mask would be a perfect fit over the sculpture itself. Now let's flash forward a little bit.
I found a small boy's Oxford button up shirt at K-Mart and cut off the collar. I stained the ring around the neck with coffee. His next tie I made by sewing together scraps from the shirt itself. I used painter's tape to piece out a design for the tie and spray painted it on. Tying the tie to the neck of this piece was another challenge since it was so small.
Here you can see where I chipped away the nose.
I used a yellow rubber kitchen glove from the Dollar Store to create Leatherface's apron. I used the left one, which has a nice little "L" on it if you look close enough.
I speckeled everything with red acrylic paint for a blood effect using a toothbrush.
Here's a look at the tie and apron. It only extends about 4 inches from the sculpt. The only real draw back is that I hot glued the shirt in place around the base which made it a little wobbly.
Here's the mask on the sculpt all done up. Notice the two sets of ears from before where now only one remains on the sculpture.
Here he is in all his glory - LEATHERFACE!!
Here's a peek a how the sculpture was made to be interactive with the mask being pulled on & off. This is before the additions of the hair, shirt, etc. This was quite a challenge and I'm very excited for Wes to have this in his new home. There's some things I would change in regards to fabrication, but all in all, I think the steps I took in the pre-production of this piece helped craft a very strong sculpture. I still have a long way to go in terms of achieving a realistic figure sculpt, but I think it's not too bad for someone that's only taught themselves. It's totally a unique one of a kind piece, done all without a mold. Every project is a stepping stone to the next one. Maybe your commission will be my next piece?