A while back I had applied for Sy Fy Channel's 3rd Season of their Special Effects Make-Up Competition Show FACE OFF (Click here to check it out). Unfortunately I wasn't selected.
*Cue sad violin music and crying clowns*
I did however find out after emailing my submission that I had little less than a week to submit another video for Season 4! I knew I had to go a bit bigger, and separate myself from the competition, but I was just as limited with my materials as I was my time. Refusing to give in or offer shitty excuses I dug in and did some research into what I could pull off in the short time I had.
I didn't have enough time to sculpt and make an appliance and I didn't have any pre-fabricated. I didn't have any mechanical elements or costumes or anything fancy and store bought. I didn't have gelatin or silicone or other big budget materials. I was really nervous and was racking my brain. What I did have was Liquid Latex. So I decided to turn my weakness into a strength...
Inspiration
I love liquid latex. I still remember the first time I ever got a hold of it. I had a 3 oz bottle made by Fun World that I got from a day after Halloween sale at the local department store. I remember falling in love with that stale cat urine smell of it. Nothing in the world sets me off like that. It's like hearing the buzz of a tattoo gun for those of us that are heavily inked. I also remember not being allowed to have it anymore when I was startled by my mother who came in to check up on me when I was being too quiet and promptly spilled all of those 3 ounces of liquid latex on the carpet. Seems my fx career was dead before it was even born.
Needless to say I love how liquid latex can stretch and peel and bubble and blister and the many ways you can shape it. I would consider it to be to an fx artist what a Sharpie is to a graffiti artist. It's a building block, our training wheels. I knew I had to incorporate it all into something fun, but I wasn't sure what. I wanted it to stretch, to be organic. I was thinking of Rob Bottin's work with John Carpenter's THE THING and the stretchy-ness of it all I researched all the images I could, of tentacles, aliens, rotting fleshing, burns & wounds, going darker and deeper...
I swear this is research...
It was stumbling upon some research that I found my muse. I have a deep affinity for comic books and I knew I had to create something a bit more offbeat then the other submissions. Last time around I did a demon, decent enough, but underwhelming honestly. I completely understand why I was overlooked. I delivered a good Halloween costume at best, not something you could film, add a soundtrack to, and then have people pay to watch. This summer was going to be filled with some of the biggest comic book blockbusters of all times. I wanted to capture that excitement and capitalize on it as well. I may not be the hero you deserve, but I'm the one you're gonna get!
Eureka!
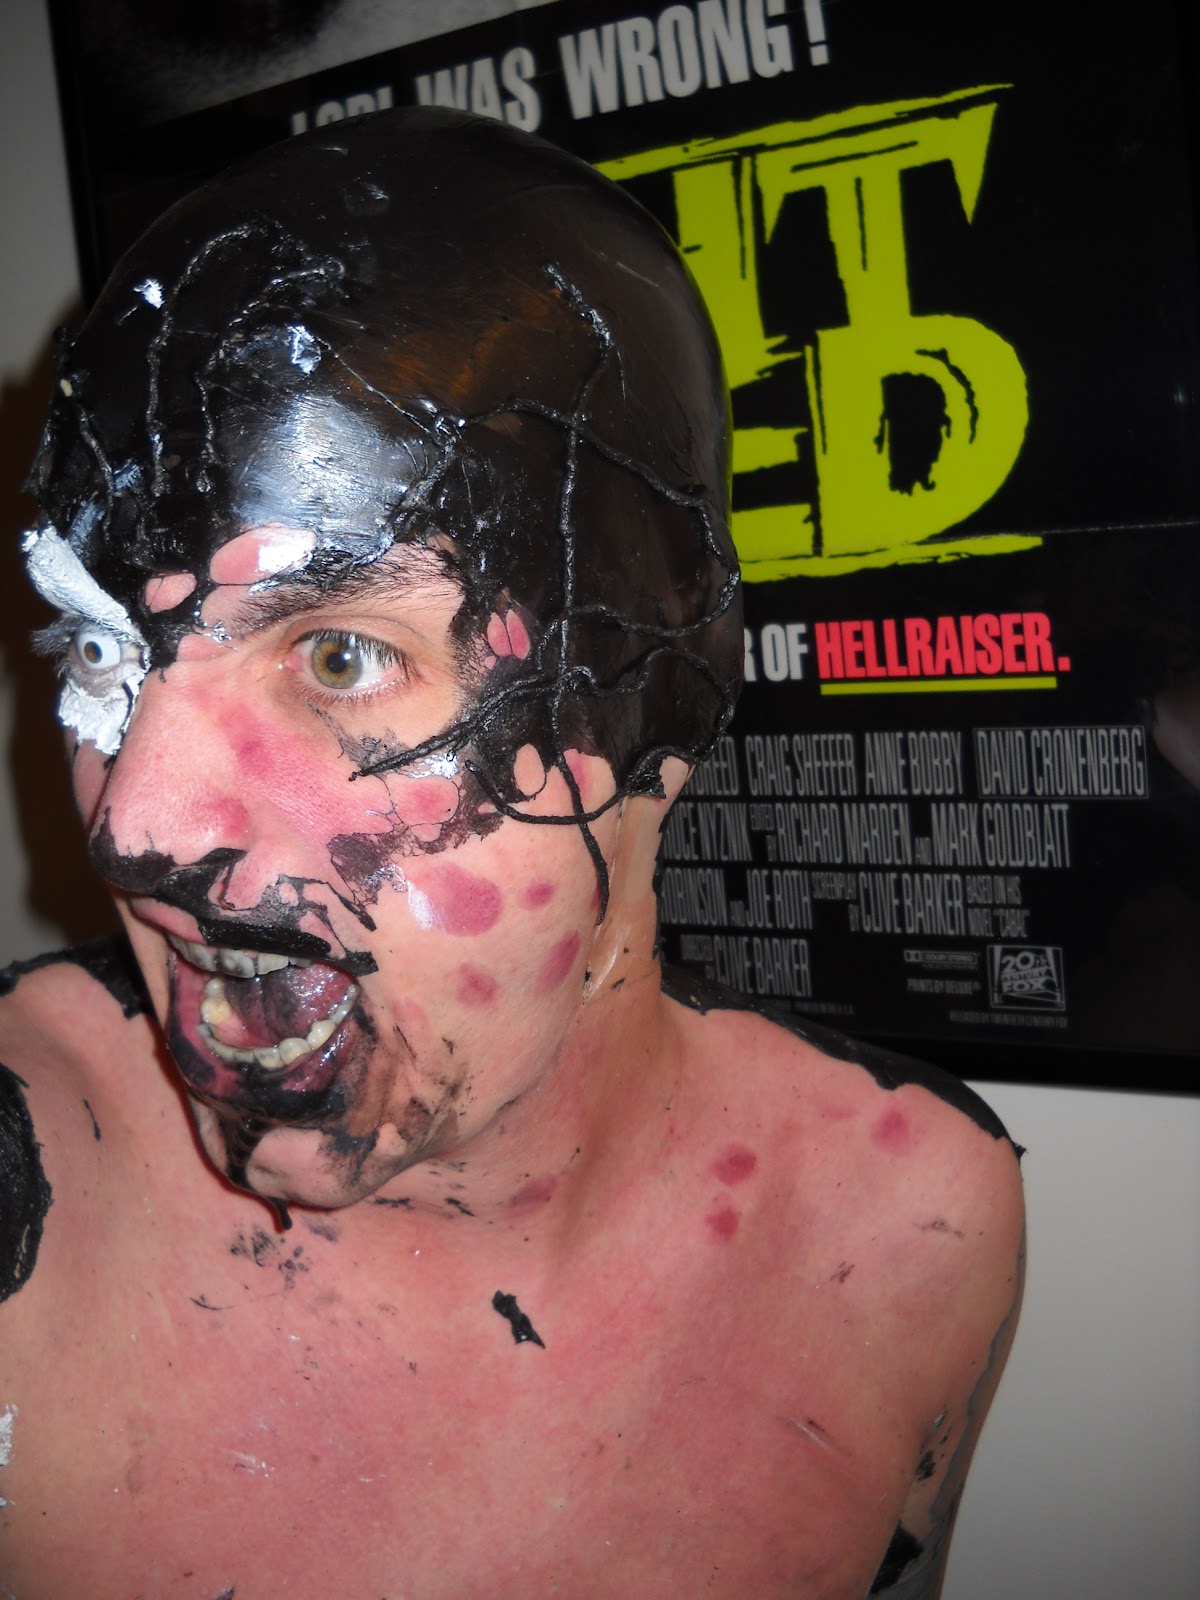
I decided I was going to deliver Spider Man from the Secret Wars story line from the Marvel comics. The black suit of his with the amazing powers is what helped birth Venom and Carnage, possibly the best villains Peter Parker ever had to face. I wanted my make-up to be a character, something that was interactive and had a bit of imagination. I wanted to give my audience some showmanship. It was important to me to show off a bit of my personality and what I could accomplish when pushed into a corner with no time, no money, and no sleep. I'd be perfect for this show.
I decided to used a mixture of liquid latex and black and white acrylic paint. This would be similar to those chuckle-heads you see at sporting events in February with nothing on but a primary color. I decided to paint up my entire upper torso and knowing the pain of having to rip/peel/scrub liquid latex off I decided to shave my arms, arm pits and everything in between. This was no small task for someone that's never had to do that. Waiting for it all to grow back is also
I first started off with a bit of red and purple make-up to simulate bruising along certain portions of my shoulders, neck and face. I outlined my abdomen and rib cage the way they airbrushed the Spartans of 300, well, as best I could on myself with grease paints and a brush in a tiny bathroom at 3am.
I made small latex tendrils by rubbing together strands of almost dried latex. These would serve as the Alien Symbiote spreading about and infecting me. I added one white contact lens for a bit of dramatic flare. I glued a bald cap down and simply painted over that as well, and then adhered those same tendrils atop of that.
The latex and acrylic paint went on easily, though I wouldn't recommend it to any one with a delicate complexion. Honestly I could have used food dye just the same. Ya live, ya learn. None of the color seeped into my skin and came off with a pull of the latex. I added a touch of black blood to my mouth and let the drool take hold. I honestly love this stuff, just how it looks and shimmers, and it's become a somewhat constant in my fx work as of recently.
So without further delay, here's my submission for Sy Fy's FACE OFF Season 4...
Ideally I would've loved to have had ringing church bells play over my hamming it up for the camera, but I think you can see an honest effort to recreate a million dollar look with a handful of quarters. Again all of this was made up, photographed and edited in less than 6 hours, all by yours truly.
Here's a few photo out-takes to highlight my efforts as I attempted the long clean up process...
What I didn't feature in the video is the massive white Spider logo I painstakingly recreated on my chest. You may see it briefly applied, but I was so sleep deprived you only get what I can give you in the video. I should have just gone to work the next morning dressed in this get-up. In the end I look like I could be a back-up dancer in a MushroomHead video. I'm cool with that. All in all I think I used about $10 worth of materials in a little under 2 hours to complete the final look. I still can't get over doing all this make-up on myself.
I had a blast tinkering with all of this and I cannot begin to thank all the people that helped link this video and spread the word on my efforts, not only for this application, but also my one previous. It's the support of my friends and people that dig what I am doing that keep me going, even if I didn't get picked for Season 4. Or I don't think I was picked. I never did hear anything. My new hope is to connect with new friends and filmmakers and explore the creative process together.
Part of my growth as an artist is dueling with the perception that I am not good enough, that I need more of a budget to do it right, more time, more training, a proper education. I see these as roadblocks in my path and while sometimes I barrel through them, or sneak around, I do have to acknowledge that they are there. It's not easy relying on passion alone. I'll doubt myself far more than anyone else ever could, and because of that I'll probably never appreciate any praise that is given to me, instead deeming it unworthy. And yet I crave external validation for these efforts. I've never met anyone that doesn't like to be appreciated. And so goes my duality of man.
As I seek to overcome that obstacle, I am, above all, compelled to create and share. I just hope what I do finds its proper audience. I just hope to give my creations a loving home.
It's been a while since I updated with any artwork or fx work and that needs to be quickly remedied. It's not that I haven't been working, quite the opposite actually. I moved a little while back I've been building a new studio and a proper home. I have a little garden and I'm still settling in, but it's time I started sharing again to push me further and harder with my artwork and hopefully entertain you enough that it warrants some proper feedback. At the very least maybe you can offer a comforting kick in the ass to get me to do more.
Here's a quick project I created on canvas board for the lovely BJC of Day of the Woman. She's a die-hard fan of the Evil Dead franchise and particularly Bruce Campbell. I'm convinced my butt-chin is the only saving grace of winning her attention. I decided to surprise her with a fun painting to help decorate her new digs, flashy and goofy and just plain fun.
Here's a pencil outline of the 4 characters from the Sam Raimi classic EVIL DEAD 2. This flick is just so much fun to watch. Whether you get held up in the camp of part one being better or vice versa, I do love the special effects make-up and Ted Raimi as Henrietta delivers one of my favorite performances besides his turn in DARKMAN. The canvas board you can pick up at Michael's or Pat Catan's. It's frame ready without needing to be stretched and you get like 6 to a package - perfect for practice and other fun projects.
I roughed in the outlines from a still from the movie and began laying down a base color to be added to as I went along. I left the pencil marks as a guide to brush over rather than erasing them and having to deal with smudges or going over with black marker or ink, which would show through under the acrylic paint.
I started building layers of color by mixing my whites and blacks with the colors I was working with as I went along. Yes, you can use pre-mixed colors that coordinate, but I believe that mixing in the moment is what gives your piece the personality it deserves. Plus it's cheaper too, and that's always a bonus.
I do like how using red and white really forces you to blend your flesh tones. You really have to have the patience and the fortitude to think ahead. Working with acrylic is a cheaper medium, but is far less forgiving it terms of blending. You can start to see a rough resemblance of what I am trying to achieve with the painting.
Next I went even darker, adding my blacks and reds. The shadows are an absolute pain in the ass, but like Burt Reynolds said in BOOGIE NIGHTS, "There's shadows in life, babe".
I did a light wash along the top with black mixed with water. Don't be afraid to experiment with texture. Here I used a paper towel to roll and smudge the colors together. Next up was my little coup de grace, the Zach special if you will...
I love how in the movie during this particular scene each actor is looking everywhere at their own pace. It's almost like the models of Robert Palmer's ADDICTED TO LOVE music video all dancing to their own rhythm. I decided to recreate that with Googly Eyes! They're hot glued on after a bit of black Sharpie to make my lines pop a bit more.
Here's the piece all said and done. I love that it's a bit more interactive as everyone I've shown it to immediately has to shake it to see the eyes in motion. It's a bit cartoony, but I really like it and I cranked it out in under two hours. I've been finding my patience for projects needs to be accelerated or I lose interest. That's not necessarily a bad thing, but everyone appreciates a lover with a slow touch a bit more, so I keep practicing and learning. Above all, I am trying to put the fun back into what I enjoy and I hope to share it more often with more people.
Here's another peak at it with a different bit of lighting. Not bad when compared to the film...
All in all it was a fun little romp of a project and forced me to practice my brushwork. You can call it fan-art if you want, I just call it a good time. Sure, I need to work on certain aspects (did you see those hands? Geeeeeez. It's like they're gonna wipe their ass with Gummy Worms.), but art is always about the journey, not the destination, right?
And if you haven't seen EVIL DEAD 2 yet, then what the hell is wrong with you? Seriously. I have the time to listen.
I recently reunited with an old housemate and friend from my days as a Bobcat at Ohio University. This unique individual is Justin Buckner, known in some circles as one half of the the intergalactic space-rock-funk-rap duo Galactic Mustache. You can find some of their (mis)adventures on their YouTube Channel, their Official Website and you can make kissy face via their FaceBook page too. You can even click here and download some free music. Since Easter's right around the corner here's one of Galactic Mustache's videos to prepare you for their mind probing...
From this reunion I was was tasked with creating the look and special effects for the zombies in Justin's new foray into short film, a project titled I AM ALIVE. The story centers around a group of zombies slowly easing their way back into humanity thanks to a government induced cure. But sometimes the cure is worse than the sickness when you're caught between the world of the living and the world of the living dead!
Well now that you're panties are as moist as a Twinkie in a fruit cellar understand that the request for how the zombies should look is very similar to a previous director's vision with GEORGE. It was another case of DUNH DUNH DUH! - Zombies, but NOT Zombies! - (If you're curious about the current state of GEORGE - click here)
1) Make Up Tests
To develop the look a step further and get a more definitive plan agreed upon in terms of style, I held a couple make-up tests at one of the script read-throughs with the cast to try out a bunch of different ideas and color schemes. I knew I would have no budget and even less time, so crucial pre-production was necessary to ensure nothing bit me in the ass come production. I knew I would have less than 30 minutes per actor, out of a cast of about 8, and they wanted to keep me at under 20 if possible to get each character ready. I figured I could and aimed to prove it. (How did he know the schedule? Well, I also built the Call Sheet and Shooting Schedule.)
This is Larena Krohe who would portray Dr. Yvonne. I haven't seen Larena since I was about 17 and now I get to make her look more than half dead. I applied latex to both sides of Larena's face and applied my favorite Cover Girl cream blush to her eyes. This made her eyes look irritated and that's just with one simple pass of color. For one cheek I added a bit of red and browns and a tinge of sheen from a micro-layer of KY jelly to insinuate peeling skin. The other check I applied a decent level of white to tone down the skin tone and added a little blood and fresh scab to detail the wounds.
Here's two graded looks to gauge how much gore and blood to use and how involved the make-up would be. It was here that gore wasn't going to be the envelope pusher, and that I should keep my barrels of red dyed Karo syrup at home. These are important conversations to have with producers and directors, and it always, ALWAYS helps when you have something to physically show them rather than just agreeing on some obscure horror movie as the palette for your current project.
Aaaah, the old paper towel/toilet paper wound, instantly adding depth and the misguided perception that you're suddenly Dick Smith. I knew I had to go old school and completely bootleg to show one vital look. A common mistake I believe people make with cheap effects is that they try to make it more than it could ever be. Sure, you can do amazing things with blending and a little bit of liquid latex, but you're not gonna pull out a STAR TREK: DEEP SPACE NINE character for under $2 in less than 10 minutes and if you can, well, you deserve to work for them.
Here's a far more blended look versus a darker/less blended look. The left photo is more blended out, and dry, while the one on the right has a bit of blood and KY Jelly (actually a bit too much, but that's why this is just a test)This one was not my favorite, but it was necessary to see the 1950s-60s style of dirt cheap effects that people still utilize. I equate this with Romero's DAWN OF THE DEAD, except I actually extended the make-up beyond the neck. This is dirty, this is grimy, but don't forget with proper lighting this can look menacing or completely comical on screen. It worked for Ed Wood, it worked for Roger Corman, it can work for you. It all depends on the mood that you're going after. Ideally if this was the look to pursue, I would go in with body paint for a more solid foundation and build from there, but that's just me.
This is Gina, Buck's wife. She was patient enough for me to play with a few different looks. Some were more blistered with a bit of grey scale....
....and I added more blacks to try and pinpoint a color scheme to work with for the characters. I find if there's some uniformity to a cast's make-up, it lends makes their characters a bit more believable. It was starting to look like the darker tones were winning over.
Ultimately it was decided that the looks would be all make-up, painted on and blended up. There just wasn't time or money for anything else. This would be ALL Ben Nye make-up wheels, Death wheel and Bruise wheel specifically, to pull all of this off. I really need to get a Skin Illustrator pack. You listening, Santa? I think I can still make this work.
Again these were all just simple make-up tests on the first sunny day of the Spring. You'll probably fail to notice that this is taking place all on a front porch while everyone enjoys a frosty PBR. It's important to bond like this because it opens proper channels of communications. People can see your efforts, offer their input and critiques and you adapt from there. Every set needs this ebb and flow or things just turn stagnant.
2) Pure Paint Stage
Now it's time to play on my own face. But how do you improve on perfection, right Mom? Hey? Hey? This is why I am so alone... I decided that this would be pure paint, no prosthetic or the like, just blending and the color scheme of white, brown, and black - a neutral template to build all the looks for the cast.
The idea was to utilize only white, brown, and black as the colors to design a cross-bred skull/zombie look. This is a lot hard to do, using just cream makeup and nothing else without it looking just, well, dirty. It should be noted that it was at about this time that my sister's basement, where I currently keep my shitty little studio, flooded and I was forced to bring all my efforts and supplies out from the wet and try to make sense of it all.
I decided to accent the look with some color contacts I had leftover from Halloween. I like how the DUNE blue eyes set the look off, but next time I would do much harsher and distinct lines over blended/softer lines.
I will say that by following your body's movement and how one will arch their eyebrows, set their eyes, and elongate their mouths and building a design around that will lend itself more to the how overall believable your paint-up is at the end. I will also say that you have to have the patience to blend and also know when to stop. Otherwise it will look like someone just smeared straight dookie on your face.
All in all, this is where I was beginning to understand the techniques I would need to utilize to develop our characters as a whole. I do dig the pseudo Dr. Phibes vibe.
3) Let's Build an Appliance
I really wanted to do up some brow appliances and mold prosthetics for the cast, but there simply wasn't the time or the money. But it was an itch I had to scratch - I had to see if there was a way I could make one dirt cheap and fast. Again I started experimenting on my own face. I recommend this so that you know exactly how certain things should and shouldn't feel for those that sit in your make-up chair. It helps you utilize your time more efficiently & effectively as well as learn from your mistakes on your own time, rather when you have no time on set.
I took some old packing foam I had left over from an eBay purchase, cut it to shape my eyes and adhered it to my face using liquid latex. I almost look like a high school musical version of Elton John. I then applied some thin strips of dried latex I had over and around the foam, securing them in place with more liquid latex.
Building up an appliance this way is quick (it sets with the drying time of latex) and relatively cheap (it's foam and latex, c'mon) but this throw away design leaves no wiggle room for a concise execution in terms of style. You're basically starting the race running backwards. From where it sits on my face is the total application, meaning there's no room for properly feathered edges to glue done. You'll see why that's important shortly.
Again I stuck with the white, brown, and black cream make-up color scheme to have a unified look to the characters. I switched colors for contacts with the thinking that this would be a significant change in the levels of being a zombie. I do like the raised brow look and how it almost seems like exposed skull. This would be an interesting look to revisit with more sharp and defined lines for next time rather than this seemingly over-blended mess. All in all, this look would have been quicker if I had a more concise design in mind from the start. It would've helped with the build-up, the edges, the color, all of it, but still this took less than 45 minutes to bang out so I can't be too mad. It almost reminded me of that Skull Faced dude Val Kilmer slices open in WILLOW.
As my face moved you can begin to see the latex pull away from the cheeks and mouth. Normally I would be able to toss on some fresh scab and fake blood and make it look like dangling skin, but I had to stick to the established parameters of scaling back the gore. It's working within limitations that you realize where you can go and what you can do; this applies to your budget, talent, time, and anything else that can trip up your efforts.
I do always love the clean skin versus made-up skin from peeling latex. It's like a weird stencil you never intended. Remember kids, hot water and soap is your friend - don't be an idiot and pull off latex that more than likely dried on top of a hair follicle.
Part of the script involves a character getting their throat ripped out. Here's a neck piece I pre-sculpted from my own neck from about 6 passes of liquid latex. I colored it in with flesh tones to match my own skin on one side. I then applied reds, burgundies, and other veiny colors to the other side. The idea was that this would be applied to the actor's neck for close up shots of a neck tear. You can faintly see a small opening to the left where I designed to insert a plastic plunger filled with blood for the effect. Ideally I would have hoses and a pump and blah blah blah but this was as cheap and quick as humanly possible. It's got fine edges and I would have been happier pulling a proper mold and all that, but it is what it is.
4) Let's Make a Movie!
I am always a big proponent of having an organized work area. If you don't know where something is you can't use it, and I want every tool available to me when I am working to get the job done as quickly as possible with at much quality as possible. I sometimes tend to bring extra of what I need, but it's far better than something I have yet to experience - forgetting something or not having it at all.
So the day of the shoot, all the actors brought their own wardrobe and wouldn't you guess it if it wasn't all WHITE, BROWN, AND BLACK! To continue with the same color scheme for the zombies would make them all look like talking turds that worked at UPS. I had to think quickly and decided to throw in more colors to off set their drab costumes, but do so without making them look far too out of place.
I decided on using a color palette of maroons, purples, and blacks, with white to drown out any flesh tones. My nervousness was compounded because my make-up was going to be filmed in HD so it had to hold up without looking unnatural. That's easier said than done when making zombies purely with your paint-on skills from your kit alone.
The main look of the zombies were their contact lenses, these are BERSERKER style - white with a circle of red around the outside. Effective and instantly recognizable that any human wearing them is not quite what they seem to be. I would center my make-up around the eyes to build up a hollow socket look and do the same with the cheekbones. You can see how important it is to also pay attention to ones hands as they can kill the look of your illusion. A simple pass at the end of their chair visit and they're ready for set.
It's amazing how significantly lighting can alter how your make-up is perceived. I highly recommend taking multiple shots from a variety of angles, with and without flash. On your own time, experiment with light settings and the apertures on your camera. If you don't know what or where those are, you probably don't deserve to own the camera that you have.
Here's Ryan. He had this very defined forehead that I knew I had to accentuate. His character is constantly emotional, the Eeyore of this 100 Acre Woods if you will, who is constantly crying. I decided to toy with that and incorporate a weeping skull look into his make-up. His colors were very dark purples and black blended in and off set with white cream. His beard stubble was a little bit of a challenge but I think for just painting and blending that this is a very strong look.
Here's almost side by side of Cryin' Ryan without and with flash. You can see how the black and purples play differently in different lighting. You definitely are able to see more of a tear trail to his eyes and an almost Goth Kid look to his sensibilities. I made his neck look a bit more skeletal than the rest of the group as well by relying in heavy whites and shadows.
Gina's almost too darn cute to have fallen prey to the Walking Dead, but her written character is also one of the most tender-hearted. I wanted to keep the females in the same color range of pinks and purples with a bit more paleness then when compared to their male counterparts. Gina's neckline to her blouse added my attention to making her clavicles more pronounced. One key bit of instrumentation to that is blending a small line of dark grey along the thicker lines of white that I applied to her chest bones. This added a more sunken look and a bit of depth. Gina's eyes were done with some Cover Girl blush and accented with a bit of purple. Her look is subtle yet significant.
This is Jen Poland who helped out immensely, not only with acquiring lights, equipment, and locations, but also stepping in as an actress at the last minute when one of the talent was a no-show. She really amazed me in her ability to pick up a script cold and become the character. It should be noted that that's one helluva wig as she's blond underneath. Pretty rocking if you ask me, and if you need further proof of her rock star abilities - check out her movie magic with Invasion Films and her music with The Poland Invasion.
For Jen's look I used the same Cover Girl cream blush, it's really a fantastic color and blends so well along the eyes. I accented lightly with purple. Since she was wearing a lower cut neckline I had to address her throat and clavicles with purple shading and a bit of white cream make-up for the pale hue. I wanted to leave as much of her natural make-up intact as her character is a bit more fashion conscious among the group, almost a Valley Girl from Beyond. I find it odd sometimes to compliment archaic body parts, but I do enjoy folks with defined clavicles and deep eye sockets. Judge me all you want.
Here's our fearless director, Justin. For his look I went with a very dark, dark purple around the eyes, with a touch of maroon for highlights and black along the cheekbones to sink the eye sockets. I used the same white cream make-up to dull his flesh tone down, and the real key is his crackhead white lips. Far too often I see "zombies" with healthy full lips that ruin the entire look when a quick dab to the mouth area with the same application to the rest of the face. That is unless you want them to look healthy. Again, it's all meant to be factored in as a complete design.
I put a bit of the purple between the webs of Justin's fingers and along his knuckles and blended white on top to ease the look together when talking with his hands and putting them near his face.
This is Jake Greener - the other half of Galactic Mustache and the resident Sound Guy/Boom Op for the flick. His character is sent away for treatment to curing the physical deformities from being formerly dead. His look was a fly-by-the-seat-of-your-pants design. I had no idea how to make this guy look formerly dead/recently "healed", until he hit my chair. The notes I was given were "more human than human" with possibly being overly tan and twisted looking or like a bad Funeral Home make-up job that's still walking around. I think I effectively captured that look. I used a flat flesh tone cream makeup that was almost off the scale in terms of matching his skin tone. I knew this would look way too faint but still have color. I used some of the Cover Girl cream blush as actual blush to give him those toy soldier cheeks. The rest is a long string of rolled liquid latex backed with some fresh scab and my bruise wheel to build up my character. I added a slight dab of KY Jelly to the sides around the edges too. When first applied it's nice and wet looking, a fresh wound appeal, but as it dries it still gives a nice shine that reflects in the same manner under certain lighting.
Here's side by side look of our Gerald. Here you can see a bit more of the dynamic difference in his skin tone. I really like the bruised purples and how they bring out the artificial rosiness in the cheeks. The amazing thing about this look was from start to finish was 15 minutes. It was a mad rush to get him back to set as there's not much you can do without sound. I sincerely impressed myself with this and still can't believe it was pulled off. I would love to try this again with a nose and/or chin prosthetic.
Here I am in action with a bit of touch ups after our first big scene wrapped a large chunk of our actors.
For a sequence at the end of the night, I gave Gina touch-ups that accented her look a bit more since she would be featured in more close-ups. This meant making the cheekbones and forehead a tad more pronounced, a bit more skull like. In another sequence Gina gets a mouthful of blood, and let me take this moment to say this - I have my own non-toxic blood formula I like, but when actors need it in and near their mouths I prefer to use Ben Nye's Zesty Mint flavored Stage Blood. It's got excellent color, flows nicely and isn't a major hassle for actors that would want to spit and rinse with something else, which can ruin your make-up and mood for the shooting day.
Here's Joe Brown - a true American, lover of all God's flora and fauna, and another reunited soul from my past. He's the poor sucker that gets his neck ripped out. He was also the Assistant Camera Man, the Assistant Director and much more. Here I applied the neck piece using a combination of latex and Pros Aide. I even surprised myself with how well the pre-painted neck piece matched Joe's skin tone. Yes, I know the neck piece looks like Old Man penis, get your mind out of the gutter, that's where mine belongs. Next time it all gets it's own sculpt, considering this is my neck on his. Think of the movie FACE/OFF, but from the chin down.
I added some Fresh Scab and a bit of blood on the outside and it was off to the streets to film the neck rip. I had a plastic plunger (I believe it's 800cc's) with fake blood to inject into the appliance. It seemed to coat and seep nicely and evenly, especially pooling in a natural sense which was a big concern. This appliance lent itself favorably to plenty of movement, but was a bit on the thicker side in terms of being able to tear apart in pieces. It came up almost all in one piece (that is one big flappy piece of fake skin), but I'm sure through the magic of editing it will all work out. For next time I would do a far thinner application in the fabrication process of latex, but that would take away a large portion of its durability. Then again I would do this effect completely differently because of the massive influx to my make-up budget, right? All in all this was roughly 30 minutes on the nose from start to finish. I'd wager a little less, but damn close.
I was really happy to be able to deliver a cohesive and creative vision to the project. In all honesty it was more of a challenge than if I did have big masks or prosthetics because the zombies all relied on how they looked. There is absolutely no way I could have done this any cheaper or quicker on my own, so it was invaluable in learning my abilities and limitations under pressure. I think that the zombies have a unique look, almost as if they were ready to host some Late Night Public Access Horror Show. I am looking forward to future projects with Justin, Joe, and the rest of the squad as they're as hungry to crank out more quality projects. It helps to have a fun project like this under your belt too to help fuel the ideas of what to do next.
A favorite moment of mine was an impromptu wrap-party at a nearby bar with a majority of the cast still in costume. You've never been given service quite like you have when you order a round of shots covered in fake blood a good 6+ months til Halloween.
Many thanks to the amazing cast & crew for all their hard work and determination. It was a fantastic experience filled with plenty of passion, grit, and a surplus of laughs. Everyone wore many hats that matched their many talents and it was refreshing to be around and work with a group of people that genuinely love making movies.
And because I can't tease you any longer, here's the trailer for I AM ALIVE just fresh out the kitchen and steaming hot. I hope you like the camera work. I actually worked holding the lens this time as well...
Be sure to keep updated on the film with pics, screenings, and other goodies via the I Am Alive FaceBook Page.