Showing posts with label Fan Art. Show all posts

Monday, July 23, 2012

Sy Fy's FACE OFF Season 4 is makin' my Spidey Sense tingle.

A while back I had applied for Sy Fy Channel's 3rd Season of their Special Effects Make-Up Competition Show FACE OFF (Click here to check it out). Unfortunately I wasn't selected. 

*Cue sad violin music and crying clowns* 

I did however find out after emailing my submission that I had little less than a week to submit another video for Season 4! I knew I had to go a bit bigger, and separate myself from the competition, but I was just as limited with my materials as I was my time. Refusing to give in or offer shitty excuses I dug in and did some research into what I could pull off in the short time I had.

I didn't have enough time to sculpt and make an appliance and I didn't have any pre-fabricated. I didn't have any mechanical elements or costumes or anything fancy and store bought. I didn't have gelatin or silicone or other big budget materials. I was really nervous and was racking my brain. What I did have was Liquid Latex. So I decided to turn my weakness into a strength...

Inspiration

I love liquid latex. I still remember the first time I ever got a hold of it. I had a 3 oz bottle made by Fun World that I got from a day after Halloween sale at the local department store. I remember falling in love with that stale cat urine smell of it. Nothing in the world sets me off like that. It's like hearing the buzz of a tattoo gun for those of us that are heavily inked. I also remember not being allowed to have it anymore when I was startled by my mother who came in to check up on me when I was being too quiet and promptly spilled all of those 3 ounces of liquid latex on the carpet. Seems my fx career was dead before it was even born.

Needless to say I love how liquid latex can stretch and peel and bubble and blister and the many ways you can shape it. I would consider it to be to an fx artist what a Sharpie is to a graffiti artist. It's a building block, our training wheels. I knew I had to incorporate it all into something fun, but I wasn't sure what. I wanted it to stretch, to be organic. I was thinking of Rob Bottin's work with John Carpenter's THE THING and the stretchy-ness of it all I researched all the images I could, of tentacles, aliens, rotting fleshing, burns & wounds, going darker and deeper...

I swear this is research...

It was stumbling upon some research that I found my muse. I have a deep affinity for comic books and I knew I had to create something a bit more offbeat then the other submissions. Last time around I did a demon, decent enough, but underwhelming honestly. I completely understand why I was overlooked. I delivered a good Halloween costume at best, not something you could film, add a soundtrack to, and then have people pay to watch. This summer was going to be filled with some of the biggest comic book blockbusters of all times. I wanted to capture that excitement and capitalize on it as well. I may not be the hero you deserve, but I'm the one you're gonna get!

Eureka!

I decided I was going to deliver Spider Man from the Secret Wars story line from the Marvel comics. The black suit of his with the amazing powers is what helped birth Venom and Carnage, possibly the best villains Peter Parker ever had to face. I wanted my make-up to be a character, something that was interactive and had a bit of imagination. I wanted to give my audience some showmanship. It was important to me to show off a bit of my personality and what I could accomplish when pushed into a corner with no time, no money, and no sleep. I'd be perfect for this show.

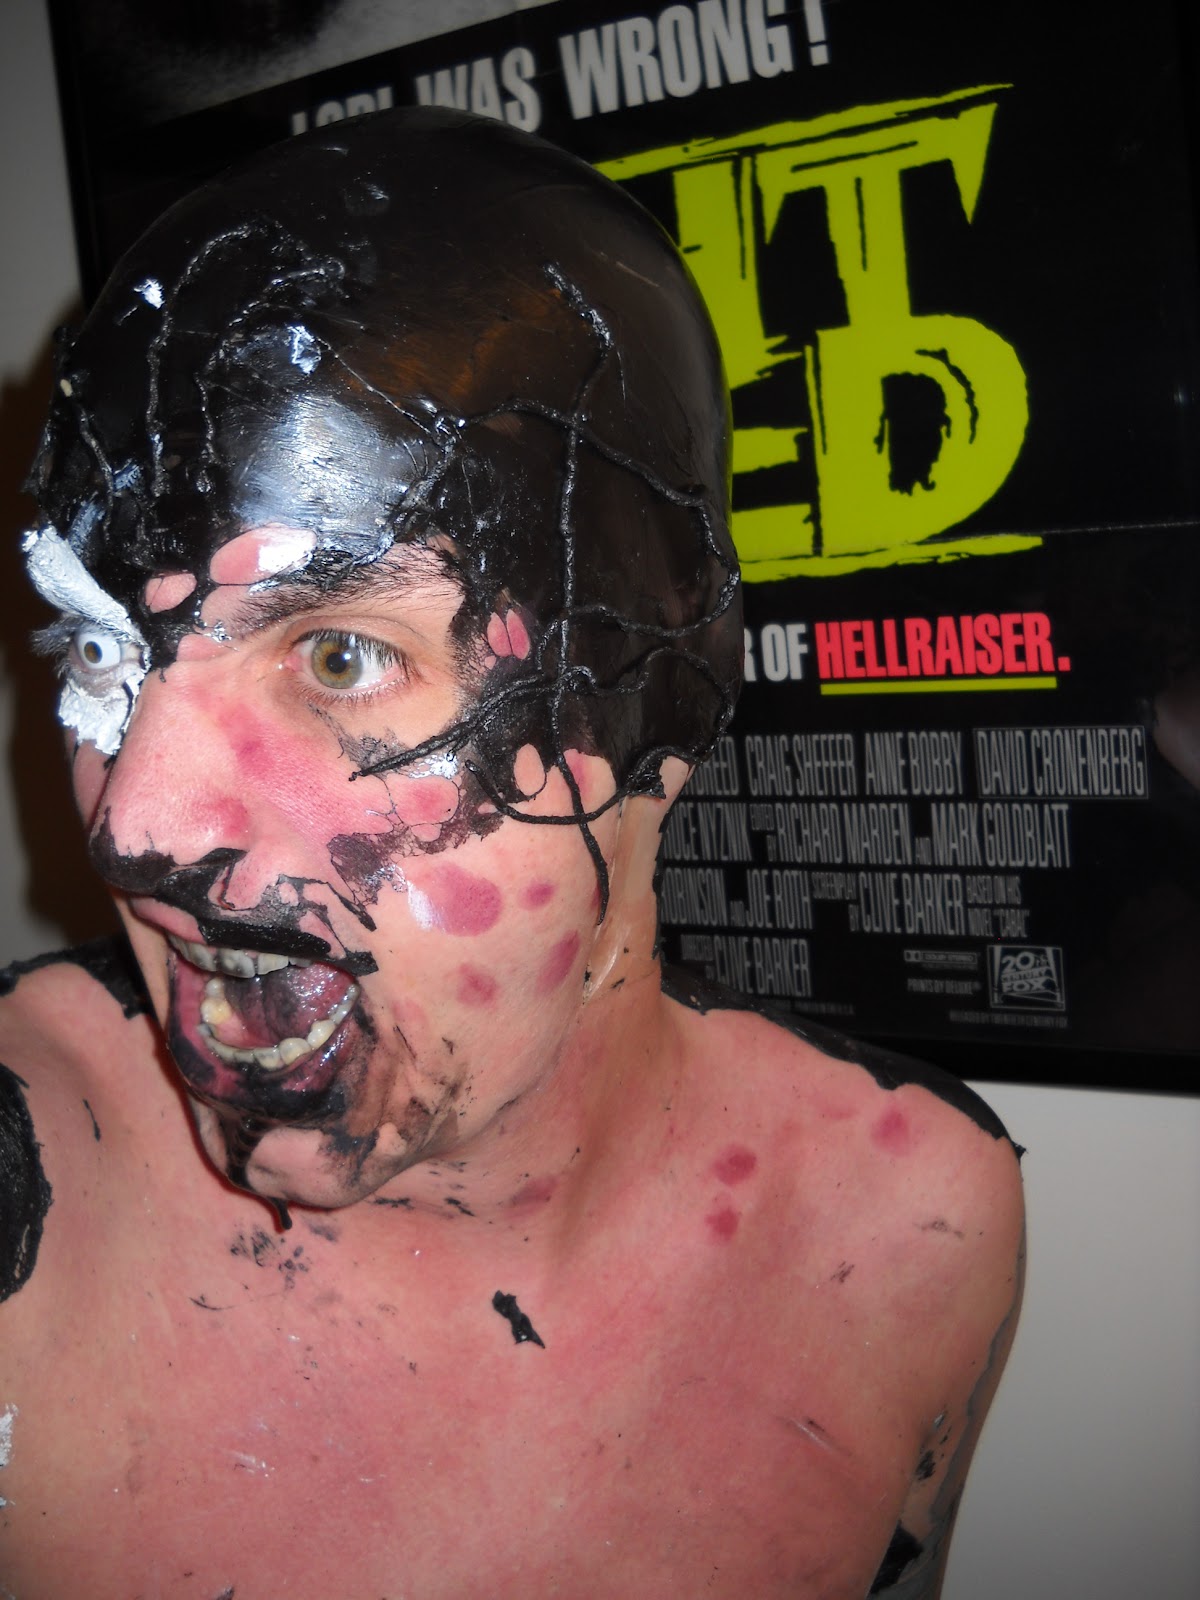
I decided to used a mixture of liquid latex and black and white acrylic paint. This would be similar to those chuckle-heads you see at sporting events in February with nothing on but a primary color. I decided to paint up my entire upper torso and knowing the pain of having to rip/peel/scrub liquid latex off I decided to shave my arms, arm pits and everything in between. This was no small task for someone that's never had to do that.  Waiting for it all to grow back is also

I first started off with a bit of red and purple make-up to simulate bruising along certain portions of my shoulders, neck and face. I outlined my abdomen and rib cage the way they airbrushed the Spartans of 300, well, as best I could on myself with grease paints and a brush in a tiny bathroom at 3am.

I made small latex tendrils by rubbing together strands of almost dried latex. These would serve as the Alien Symbiote spreading about and infecting me. I added one white contact lens for a bit of dramatic flare. I glued a bald cap down and simply painted over that as well, and then adhered those same tendrils atop of that.

The latex and acrylic paint went on easily, though I wouldn't recommend it to any one with a delicate complexion. Honestly I could have used food dye just the same. Ya live, ya learn. None of the color seeped into my skin and came off with a pull of the latex. I added a touch of black blood to my mouth and let the drool take hold. I honestly love this stuff, just how it looks and shimmers, and it's become a somewhat constant in my fx work as of recently.

So without further delay, here's my submission for Sy Fy's FACE OFF Season 4...


Ideally I would've loved to have had ringing church bells play over my hamming it up for the camera, but I think you can see an honest effort to recreate a million dollar look with a handful of quarters. Again all of this was made up, photographed and edited in less than 6 hours, all by yours truly.

Here's a few photo out-takes to highlight my efforts as I attempted the long clean up process...


What I didn't feature in the video is the massive white Spider logo I painstakingly recreated on my chest. You may see it briefly applied, but I was so sleep deprived you only get what I can give you in the video. I should have just gone to work the next morning dressed in this get-up. In the end I look like I could be a back-up dancer in a MushroomHead video. I'm cool with that. All in all I think I used about $10 worth of materials in a little under 2 hours to complete the final look. I still can't get over doing all this make-up on myself.

I had a blast tinkering with all of this and I cannot begin to thank all the people that helped link this video and spread the word on my efforts, not only for this application, but also my one previous. It's the support of my friends and people that dig what I am doing that keep me going, even if I didn't get picked for Season 4. Or I don't think I was picked. I never did hear anything. My new hope is to connect with new friends and filmmakers and explore the creative process together.

Part of my growth as an artist is dueling with the perception that I am not good enough, that I need more of a budget to do it right, more time, more training, a proper education. I see these as roadblocks in my path and while sometimes I barrel through them, or sneak around, I do have to acknowledge that they are there. It's not easy relying on passion alone. I'll doubt myself far more than anyone else ever could, and because of that I'll probably never appreciate any praise that is given to me, instead deeming it unworthy. And yet I crave external validation for these efforts. I've never met anyone that doesn't like to be appreciated. And so goes my duality of man.

As I seek to overcome that obstacle, I am, above all, compelled to create and share. I just hope what I do finds its proper audience. I just hope to give my creations a loving home.


I'm all Googly for Evil Dead II

It's been a while since I updated with any artwork or fx work and that needs to be quickly remedied. It's not that I haven't been working, quite the opposite actually. I moved a little while back I've been building a new studio and a proper home. I have a little garden and I'm still settling in, but it's time I started sharing again to push me further and harder with my artwork and hopefully entertain you enough that it warrants some proper feedback. At the very least maybe you can offer a comforting kick in the ass to get me to do more.

Here's a quick project I created on canvas board for the lovely BJC of Day of the Woman. She's a die-hard fan of the Evil Dead franchise and particularly Bruce Campbell. I'm convinced my butt-chin is the only saving grace of winning her attention. I decided to surprise her with a fun painting to help decorate her new digs, flashy and goofy and just plain fun.


Here's a pencil outline of the 4 characters from the Sam Raimi classic EVIL DEAD 2. This flick is just so much fun to watch. Whether you get held up in the camp of part one being better or vice versa, I do love the special effects make-up and Ted Raimi as Henrietta delivers one of my favorite performances besides his turn in DARKMAN. The canvas board you can pick up at Michael's or Pat Catan's. It's frame ready without needing to be stretched and you get like 6 to a package - perfect for practice and other fun projects.

I roughed in the outlines from a still from the movie and began laying down a base color to be added to as I went along. I left the pencil marks as a guide to brush over rather than erasing them and having to deal with smudges or going over with black marker or ink, which would show through under the acrylic paint.


I started building layers of color by mixing my whites and blacks with the colors I was working with as I went along. Yes, you can use pre-mixed colors that coordinate, but I believe that mixing in the moment is what gives your piece the personality it deserves. Plus it's cheaper too, and that's always a bonus.

I do like how using red and white really forces you to blend your flesh tones. You really have to have the patience and the fortitude to think ahead. Working with acrylic is a cheaper medium, but is far less forgiving it terms of blending. You can start to see a rough resemblance of what I am trying to achieve with the painting.


Next I went even darker, adding my blacks and reds. The shadows are an absolute pain in the ass, but like Burt Reynolds said in BOOGIE NIGHTS, "There's shadows in life, babe".

I did a light wash along the top with black mixed with water. Don't be afraid to experiment with texture. Here I used a paper towel to roll and smudge the colors together. Next up was my little coup de grace, the Zach special if you will...


I love how in the movie during this particular scene each actor is looking everywhere at their own pace. It's almost like the models of Robert Palmer's ADDICTED TO LOVE music video all dancing to their own rhythm. I decided to recreate that with Googly Eyes! They're hot glued on after a bit of black Sharpie to make my lines pop a bit more.


Here's the piece all said and done. I love that it's a bit more interactive as everyone I've shown it to immediately has to shake it to see the eyes in motion. It's a bit cartoony, but I really like it and I cranked it out in under two hours. I've been finding my patience for projects needs to be accelerated or I lose interest. That's not necessarily a bad thing, but everyone appreciates a lover with a slow touch a bit more, so I keep practicing and learning. Above all, I am trying to put the fun back into what I enjoy and I hope to share it more often with more people.


Here's another peak at it with a different bit of lighting. Not bad when compared to the film...


All in all it was a fun little romp of a project and forced me to practice my brushwork. You can call it fan-art if you want, I just call it a good time. Sure, I need to work on certain aspects (did you see those hands? Geeeeeez. It's like they're gonna wipe their ass with Gummy Worms.), but art is always about the journey, not the destination, right?

And if you haven't seen EVIL DEAD 2 yet, then what the hell is wrong with you? Seriously. I have the time to listen.

Tuesday, November 29, 2011

I promised to show you my TAINT

One of the most original, tongue-in-cheek, gore fest flicks I've seen this year has to be THE TAINT. You can read my review of it over at BloodSprayer.com. It's the type of film I love introducing to friends because of how over the top it is; it basically is the style of cinema that will determine if we'll be friends or not.

For those unfamiliar with this film, here's the NSFW trailer:


I showed the film to some friends and one of them, Kevin Polyak, instantly fell in love with it. He wondered if I was capable of producing a mask from this film for his Halloween costume. Basically a drunken gauntlet was thrown down in my mind and I was determined to make his challenge a reality. The mask he wanted was from a flashback sequence when a character is forced to duct tape their own ripped off face back onto their head.

Reference Still from THE TAINT

I decided to take the look of the mask a bit further. I brainstormed what this face would look like for the possible sequel to this film. I wanted to show the skin in a bloody, leathery state; contorted and disturbing. This would be my own version of Film Fan Art. What I envisioned was a cross between Freddy Kreuger, the Cropsey Maniac, Leslie Vernon and when actor Lou Perryman gets his face ripped of in TEXAS CHAINSAW MASSACRE II. Basically all the terribly wonderful things that delightfully taunt my imagination and memories.


I knew that this was going to be my first attempt at making a mask so I wanted it to be special, I wanted it to be custom, I wanted it to be one of a kind. I decided that I wasn't going to go about the traditional means of sculpting and pouring a mold. I was going to do a layer by layer build up of liquid latex from a Ultra-Cal casting of my own face.


I gobbed on the latex knowing it would take longer to dry this way, but give me a rippled foundation that I would make look like fat. It would be later that I would augment it further.


Here you can see the first layer dry. Not a bad start, very Toxic Avenger, but that's not what I was going for...


I had previously poured strips of liquid latex on my arm and as it dried, I would peel off these layers and stretch them over the face. I would definitely do thinner strips if I made this same mask the same way again, but that ship already sailed. Still it had a very distinct look versus if I had made it appear droopy and saggy. I wanted HUMAN BEEF JERKEY!


I filled in cracks and crevices with sponges and brushes, making sure not to lose the basic elements of the face underneath my half-cocked scheme of a technique. You have to make sure you have your ability to see, speak, and breathe with a mask, and if you know Kevin that means drinking too.


The mask was really taking shape with over a dozen layers of liquid latex cured throughout. It was now time to peel away and start the process of painting.


Here is the pull of the mask from the front view.....


.....and here is the back/inside of the mask.


I trimmed the edges with scissors to scale down some of my excess, but the idea was that this mask was to cover a good sized chunk of the face so I made sure there was a little extra along the top of the forehead and beneath the chin. My version of old school Trick 'r Treating theater if you will.

I started painting with pinks and purples, knowing that this would be the basis of what I would build and blend from in regards to shadow and composition.


I soon started adding more reds and browns to the mix, darkening certain areas and bringing the colors more to my liking.


I blended and blended, but I knew I would need some highlight to make the piece really punch. My secret weapon? Nail polish. Yup. I used a clear pearl glaze to add a sheen of viscous and sliminess and I used fire engine red for blood, which looked fresh and tacky even when completely dried. I added a couple layers of blending on top of this to tone it down and push forward.


To hold the mask in place I created a band from stretch elastic ribbon you can buy at any craft store. But I also wanted to hide this as well as utilize this necessity. I used grey Gaff tape, instead of Duct tape and folded it over top of itself and slipped the elastic through all the way around the mask. I chose the Gaff tape because it is porous enough to accept paint and aging where Duct tape would wipe right off.


A closer look shows how the "tape" hides the band.


Here I am wearing my own creation, moments after completion. It's definitely a face only a mother could love either way.


And like any good artist you have to make sure you sign your work. I probably would've stamped into the mask for this, but a black Sharpie has never failed me before.


Here are a few pics I would update Face Book with via my phone and the camera application Little Photo.


It was quite fun to see the changes the process took as this project came to a close. I learned several new techniques and ways to go about creating the look I want and how to avoid the look I don't want. I now plan on tackling the craft of mask making on a larger scale with a sculpt and mold in the near future to produce a limited run of original creations.

Kevin completely forgot that I had promised to make him this mask. It arrived just in time for him to enjoy the Halloween weekend and not be completely lame without a costume. And that's what you should walk away with if anything from this article; not wearing a costume on Halloween means you are super-mega lame. That and always keep your promises.


Here's a couple of pics of Kevin in all his glory Halloween weekend.

And you thought the rats were the scariest part of the NY Subway...

Kevin and his special lady friend

Now here's hoping that they do make a sequel to THE TAINT!!

Wednesday, February 9, 2011

We know what to do with them parts - Bringing Leatherface to life

The illustrious Wes Allen, the bearded front man of The High Gears and the perverted mind behind The Blood Sprayer, commissioned me a while back about fabricating a sculpture for him of his Horror movie hero Leatherface. He left the specifics of the design to my discretion and I eagerly accepted the challenge. Honestly I love this entire film franchise, even the remakes. It's one of my all time favorite slasher films, and presents such an iconic depiction of American horror and the nuclear family. I wanted to include a bit of all of the films within this piece, which was quite the challenge. It was also a fabulous excuse to rewatch the entire series as research. Here's some of what came out of the project.

 I started off with oven-bake modeling clay, which is easy to work with as long as you keep it moist. The clay bakes up in the oven and turns into a terra cotta solidity like a flower pot. I crafted a head shape from left over wire mesh and stuffed with paper towels.

 Here's what I would build the head shape around. I didn't want the piece to be so heavy as a solid piece, but I needed to keep a solid form with its structure. Otherwise it would take far too long to bake and I would risk residual cracks if not careful.

 I started with a basic shape to the head, sculpting the head, nose, eye sockets and the beginnings of the mouth.

I sculpted two sets of ears - one set for the head itself, and one for the design of the mask, which I'll discuss later.

I began working in the eyes and a bit more to the mouth, adding teeth and a gum line. It's important to have a bowl of water nearby for smoothing out creases and fingerprints as you go along.

 As I became more comfortable with the shape of the head I decided to focus on the support structure for the piece.

 I built up a neck and added a slight cock to the neck, which adds a bit of personality to the stillness of it all.

 Angular and distorted, the piece was starting to come to life.

  At different angles you can see the shape of the piece.

Here's everything just ready to bake!

Letting the piece dry for a couple days, I finally baked it. After pulling it, there were some residual cracks, but I knew that the wire mesh I had sculpted around would hold the piece intact. But I had a plan in place to fix this. I also pulled out the paper towels within from beforehand.

 I went over the cracks with epoxy from Home Depot. It was a two part mix and stunk something fierce (probably because of how flammable it was), but that's half the fun of playing with art. Always work in well ventilated areas, kids.

 I dusted the piece in baby powder because of the tackiness from the epoxy. This was an important precaution for the next step.

 I began to coat the piece in 12-14 coats of liquid latex, dabbing each layer on, waiting to dry, and then applying again. It was a process, but well worth it.


 I gently peeled the latex back, dusting with baby powder so as not to tear it. This is the pull of it, the underside.

 Flipping it inside out, here's what I was chasing after.

 I took a pair of cuticle scissors and snipped away the excess to create the representation I was looking for.

 I only wanted one set of ears, the closest pair to the nose, so I trimmed those away and trimmed along the neck and chin line. I began painting this mask in a blend of acrylic paints. I was going for an aged leather look, just like dead skin left to dry.

 It was tricky to blend the right degree of shadow and skin tone on something that was so curved. But I like where it was going.


Here's a front view.


I wanted to represent the side of Leatherface you don't often see, the cross-dressing aspect of the franchise that larger gets glazed over, but solely utilized for its creepiness. I added smeared blue paint for eye shadow, rosy pink paint for blush and a blood red jagged lining of paint for lipstick.

 I went along the brow line with black thread and stitched into the mask. This was a bit of a challenge, especially with the rubber giving way and pulling. I didn't want to put too many holes in this or tear it. I had to do this after painting because there's no way I could paint around the thread. It was a challenge but it really adds to the look of the mask.

This stitching goes from the hairline down along the front side of the ears. I wanted a jagged, hand done touch to it all.

 Now for the Pièce de résistance - I stole the hair from my girlfriend's brush. I picked it out over the course of a few weeks and amassed enough to cover the head. I adhered it to the mask using liquid latex.

Here's a side view where you can see more of the hair and the side stitching. The hair had to be layered and let me tell you what a pain in the ass it is to work with glue and hair. But I really think that it adds a super eerie factor to the piece and reflects the subject matter properly.


 For the sculpt I chipped off the nose and the additional set of ears towards the back of the head. I then painted it up in a more rosy flesh like appearance with appropriate shading.

This look would be a base coat that I would then coat in Shellac.


With this coating of Shellac it gave the piece a urine hued coloring. The stink was another fun element to contend with, but this protective coating would ensure that the color wouldn't smudge with handling the piece. It gave it a bit of shine that I'm sure will dull with age while tuning down the painted flesh tones.


 Here's the piece before the Shellac coating.

Here it is after.

The idea is that this mask would be a perfect fit over the sculpture itself. Now let's flash forward a little bit.

 I found a small boy's Oxford button up shirt at K-Mart and cut off the collar. I stained the ring around the neck with coffee. His next tie I made by sewing together scraps from the shirt itself. I used painter's tape to piece out a design for the tie and spray painted it on. Tying the tie to the neck of this piece was another challenge since it was so small.

 Here you can see where I chipped away the nose.

 I used a yellow rubber kitchen glove from the Dollar Store to create Leatherface's apron. I used the left one, which has a nice little "L" on it if you look close enough.


 I speckeled everything with red acrylic paint for a blood effect using a toothbrush.

 Here's a look at the tie and apron. It only extends about 4 inches from the sculpt. The only real draw back is that I hot glued the shirt in place around the base which made it a little wobbly.

 Here's the mask on the sculpt all done up. Notice the two sets of ears from before where now only one remains on the sculpture.

Here he is in all his glory - LEATHERFACE!!


Here's a peek a how the sculpture was made to be interactive with the mask being pulled on & off. This is before the additions of the hair, shirt, etc. This was quite a challenge and I'm very excited for Wes to have this in his new home. There's some things I would change in regards to fabrication, but all in all, I think the steps I took in the pre-production of this piece helped craft a very strong sculpture. I still have a long way to go in terms of achieving a realistic figure sculpt, but I think it's not too bad for someone that's only taught themselves. It's totally a unique one of a kind piece, done all without a mold. Every project is a stepping stone to the next one. Maybe your commission will be my next piece?

I'll let this gem play me out...