
 We also received an addition to our kit, a "bruise" color wheel. This is the small wheel with four colors. Larger wheels usually cost about $5 more and include an extra 2 colors. This is a great addition, as it saves the time needed to mix those colors from our other color wheels.

The tools are very simplistic. Tongue depressors help shape and apply the wax seen here in the metal tubs. When working with wax, it's important to remember as it's worked and applied to the skin that temperature will change the way it can be shaped and molded. It's applied in a layered effect, but can achieve a look similar to something that would normally be cast silicone, latex, or gelatin if you had the time. This is all about the "quick fix".
 Here's a rough schematic I did to illustrate the process.
Please start with clean skin. Run a Baby-Wipe over the skin to make sure there's no dirt or grease to interfere with your work.
1) You start with a small application of ProsAid. This is our adhesive for our Cotton Ball.
2)You take a small Cotton Ball and dab it once on the area. It will immediately stick, leaving behind cotton fibers.
3)These fibers are what helps the wax stick to your hand as well as the liquid latex used to seal it.
4) Coat in 3-5 Layers of Liquid Latex.
5) Apply make-up and blend.
6) Powder for glare.
7) Add blood if needed.
8) Remove and clean-up.
The effect is achieved by layering each material on top of each other in consecutive circular patterns.

You're really only want to work with a dime sized amount of wax. It spreads a bit and lends itself to larger coverage.
 Using a flat edge, you can create a line by cutting into the wax. The curvature and deepness is up to you as the artist and what is being asked of you to deliver.
 Once you're happy with the cut coat the wax build up in about 3-5 layers of liquid latex. The heavier you apply each coat the longer it will take for the latex to dry.
 If timing is crucial, use a hair dryer set on COOL (you don't want to burn your actor in a hurry) to speed up the process.
 Now the cut is ready for some color. This will add the detail of bruising and all that fun goriness. By adding a small amount of GP 20 (available from Alcone Cosmetics) to your color wheel you are able to create your own grease paints. For the most desired look, grease paints should be used to apply proper color and even coverage. Your color wheels were not entirely meant to be used to paint directly on top of latex and wax, but they will work.
 Remember to stipple each color, blending away from your wound. Exercise caution as the wax is still pliable. Pushing or blending too hard with your brushes can augment the shape.
 The art of it comes in how quickly you can create this look with the eyes of the entire crew on you working away. Though you will be rushed to deliver, take the time to ensure each step is correct and you will achieve a realistic effect that saves the day.
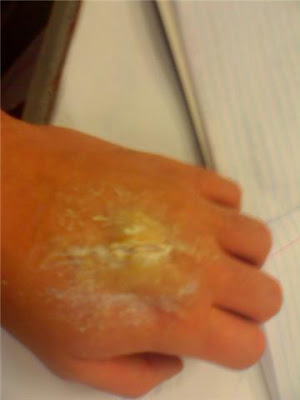
Here I start on my own hand with an application of ProsAid and then a dab from the Cotton Ball.

I begin to sculpt a small amount of wax on top of the cotton. Here you want to be careful to work from the edges first. Starting from the middle first flattens the material and ruins the effect of raised flesh.

I take the same tongue depressor I was using to sculpt the wax and use the tip to carve a 2 inch cut into the wax.

I then began the process of applying 3 layers of latex over the wax. You want to make sure that the latex is coating the inside of the cut as well. This helps prevent smudging of the wax and and seals everything in for when you begin to apply makeup.
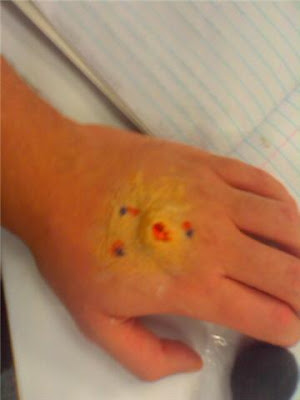
 Now I'm ready for bruising. It's a random pattern of pixelated dots blended together. Remember to be a bit more gentle in your stippling as the material underneath is not as firm as if you applying it directly to your hand. The more layers of latex you apply, the less flexible the material becomes. This is good to know if the effect is applied to areas like the wrists or face.
 Here's another schematic I did to better illustrate the process of blending your bruises.
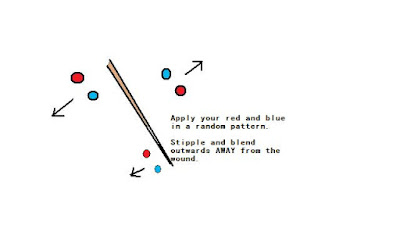

With the wax, you can manipulate it a bit more since the material is so pliable. This helps in creating divots and pock marks that add the element of texture and shadow to your effect.
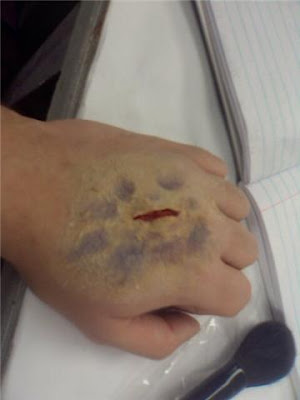
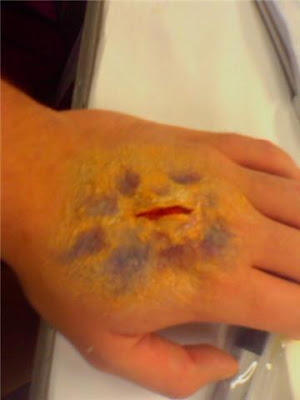 Here I add a touch of powder to take off the glare and a bit of fresh blood to add a touch of realism.
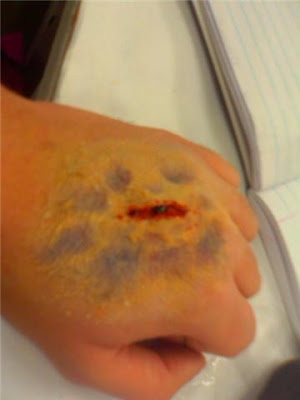
The effect is still flexible enough on my hand to allow for complete movement. I'm not entirely happy with the bruising as it seems bit much for such a small cut. It also looks a bit over-blended for my liking.
Time for a Gun Shot. It's important to remember that there are two types of bullet holes. 1) Entry wound which is small, clean, and precise. 2) Exit wound is much larger and messier as the bullet exits the body.
I used my fingers a bit more to mold a more circular shape with the wax. This is of course after the application of ProsAid and Cotton. I decided to use less make-up in the blending to see how far I could stretched the look of the effect.


 Now I'm ready for bruising. It's a random pattern of pixelated dots blended together. Remember to be a bit more gentle in your stippling as the material underneath is not as firm as if you applying it directly to your hand. The more layers of latex you apply, the less flexible the material becomes. This is good to know if the effect is applied to areas like the wrists or face.
 Here's another schematic I did to better illustrate the process of blending your bruises.

With the wax, you can manipulate it a bit more since the material is so pliable. This helps in creating divots and pock marks that add the element of texture and shadow to your effect.
 Here I add a touch of powder to take off the glare and a bit of fresh blood to add a touch of realism.
The effect is still flexible enough on my hand to allow for complete movement. I'm not entirely happy with the bruising as it seems bit much for such a small cut. It also looks a bit over-blended for my liking.

Time for a Gun Shot. It's important to remember that there are two types of bullet holes. 1) Entry wound which is small, clean, and precise. 2) Exit wound is much larger and messier as the bullet exits the body.

I used my fingers a bit more to mold a more circular shape with the wax. This is of course after the application of ProsAid and Cotton. I decided to use less make-up in the blending to see how far I could stretched the look of the effect.

With a touch of powder and blood, I really enjoy how this effect worked out. Of course you can ALWAYS add more blood. Those are my two favorite words on any set; MORE BLOOD.

Ideally these techniques are meant to be used as fail safes. No producer wants to hear about problems, only solutions. By utilizing these skills, you can safely and professionally say, "This is what I can do..."
Cool stuff as always! It seems like I'm always asked to do more on set, even though I try to figure out stuff in advance. EFX Makeup is the last thing the director wants to worry about, unless it's a horror film. :)
ReplyDeleteDid you dress up for Halloween? I liked your post with the ideas for costumes. If so, I'd love to see some pics.
Unfortunately I had to work on Halloween, but I did meet up with a few of my friends in my writing group. I went as a pre-burnt Freddy Krueger w/ sweater and glove. The idea was I'm still not caught and I'm out there molesting your kids as the world's worst babysitter.
ReplyDeleteHopefully next year I can put together something proper and photo worthy.